The Ports and Adapters Pattern: Unraveling the Mystery
Dive deep into the ports and adapters pattern to grasp its crucial role in creating resilient, robust and modular software architecture in Python.

Introduction
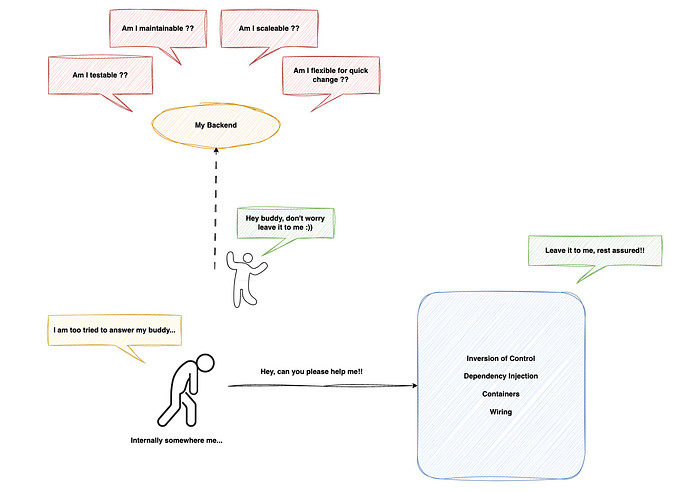
Designing and maintaining a resilient software architecture can be quite challenging, specifically in systems that need high adaptability and long-term robustness. One of the common concerns while working with such an architecture is managing dependencies and ensuring that changes made in one part of the system do not affect the entire application. This is where the ports and adapters pattern, also known as the hexagonal architecture, steps in to expedite the process.
The ports and adapters pattern is a subset of SOLID principles that decouples a system’s core logic from its external dependencies, such as databases and other services. This pattern helps to build applications that are modular, maintainable, and testable, making them scalable. By separating the domain or core business logic from external resources, this pattern ensures that the system remains flexible and resilient to changes within the domain. In this article, we will delve into the concepts of ports and adapters and implement them in the Python programming language using FastAPI framework.
Overview
Let’s take a look at the topics that we are going to cover in this article.
- What is the ports and adapters pattern?
- Why choose the ports and adapters pattern?
- What are we building?
- Prerequisites
- Implementation
- Conclusion
- References
What is the ports and adapters pattern?
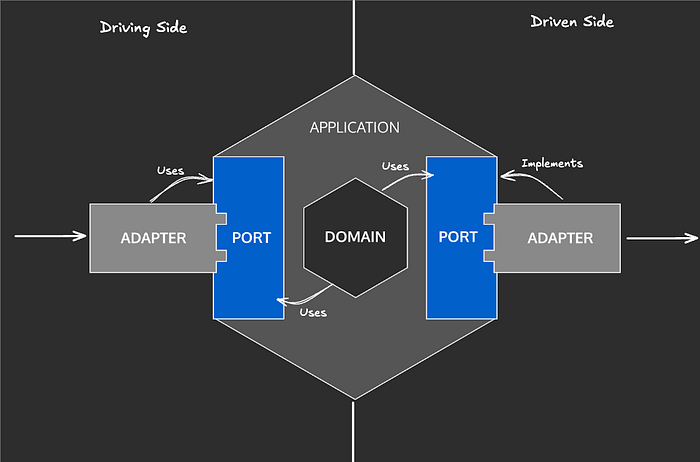
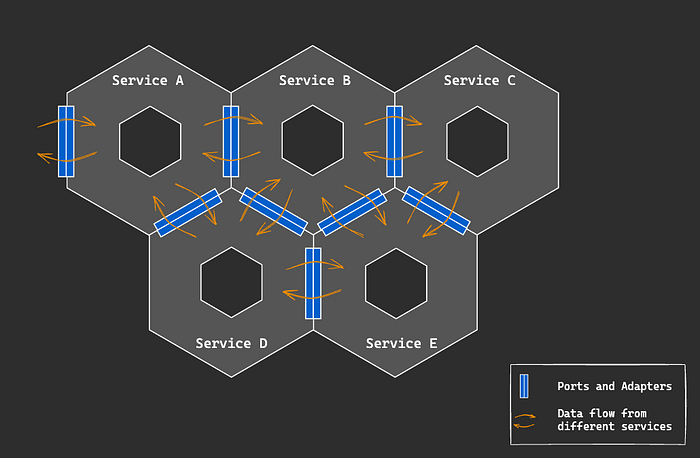
The ports and adapters pattern, or hexagonal architecture, is an architectural pattern used in software design. It aims at creating loosely coupled application components that can be easily connected to their software environment by means of ports and adapters. Ports represent the system’s entry points, and adapters handle external systems like databases and third-party services. By setting such boundaries, the domain or core logic remains isolated and agnostic of the surrounding infrastructure, making it easier to test, maintain, and scale.
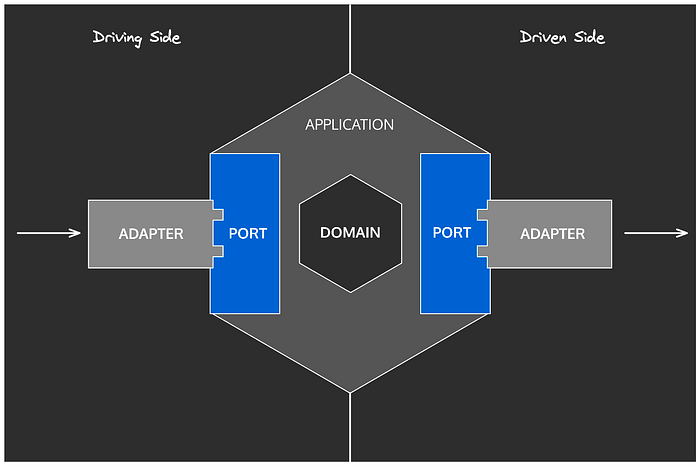
At a foundational level, this pattern inspires a design where the core application is surrounded by a layer of interfaces (which are nothing but ports) that define the operations available to the outside world. These interfaces, or ports, are then connected to external resources through adapters. The adapters are nothing but mere implementations of interfaces or ports. For example, a database adapter would handle the data retrieval and storage operations, translating them into a form the core application could understand and use. Such partitioning between external resources and domains allows developers to edit or replace adapters without touching the core logic. This helps promote flexibility and resilience in the system.
One of the biggest benefits of this pattern is its ability to enhance the testability and maintainability of software. Because of the isolation of business logic and external dependencies, developers can write unit tests that solely focus on the core functionality. This enables the application to quickly adapt to new technologies, as changes to external systems only require certain updates to the respective adapters, leaving the core domain logic intact. The bottom line is that this pattern provides a robust framework for building software that is both adaptable to change and cloistered from the complexities of its environment.
Why choose the ports and adapters pattern?
Adopting this pattern offers several compelling advantages for modern software development. One of its primary benefits is the clear separation between the core business logic and external dependencies. This separation ensures that the core logic remains clean, focused, and devoid of infrastructure concerns like database, service, and user interface integrations. As a result, the core logic becomes easier to understand, develop, and test in isolated environments. By decoupling the application from third-party services, the application becomes inherently more maintainable. Developers can evolve the business functionality without worrying about breaking changes in the system’s external interfaces, thus supporting agile and iterative development practices.
Moreover, this pattern significantly enhances the flexibility and resilience of the application. By isolating the core from the specifics of external systems, it becomes straightforward to swap out or upgrade these external resources. For instance, if an application switches from one database to another or integrates with a new service provider, you only need to change or replace the respective adapter. The core business logic remains intact. This modularity allows organisations to adapt quickly to changing technological landscapes and business requirements, reducing the risk and effort associated with system upgrades or migrations.
While this pattern offers significant benefits, it does come with some notable drawbacks. One major challenge is the increased complexity it introduces to the codebase. Each additional line of code is a liability that requires constant maintenance. Furthermore, the pattern’s steep learning curve can be a barrier for new programmers, requiring substantial time and effort to understand and effectively implement it in projects.
What are we building?
In this tutorial, we will build a Todo application using Python and the FastAPI framework. Our application will use SQLite3 as its database, and Alembic for handling data migrations. We’ll start from scratch by setting up a new FastAPI project and continue to develop it into a fully functional Todo app capable of performing Create, Read, Update, and Delete (CRUD) operations with the database.
Prerequisites
Following are the prerequisites before we start building our Todo application.
- Python (^3.10)
- Poetry (Python packaging tool) (latest version recommended)
- FastAPI (^0.111.0)
- Sqlalchemy (^2.0.30)
- Alembic (^1.13.1)
- Pydantic (^2.7.3)
Implementation
Let’s get started with our implementation. All the resources are added at the end of this article for your reference.
Project setup
First let’s create a new python project using Poetry tool. Follow the below command to create a new python project named todo_app. Don’t worry about the --name flag as it creates a new module inside src called entrypoints
poetry new todo_app --src --name entrypointsNow, let’s create some more modules inside our src folder namely, adapters and domain. Create a main.py file that will act as our main file for the whole application.
Now, its time for installing the required packages for our project. Run the following command that will install the packages.
poetry add fastapi sqlalchemy alembic pydanticNote: Please note that Poetry will install Python by default and it is not required to add it separately.
Alembic setup
Let’s setup alembic in our project as our database migration tool. First run the following command to confirm alembic is installed properly.
poetry run alembic --versionIf you see the alembic version then you are good to go. Else, please properly install the package. Moving on, let’s configure alembic to our project using the following command
poetry run alembic init alembicThe above command initialises alembic by creating alembic/ folder and a config file called alembic.ini. There are few changes that we have to do inside alembic.ini file. Replace the following line
- # sqlalchemy.url = driver://user:pass@localhost/dbname
+ sqlalchemy.url = sqlite:///./todos_app.db
Now, we are all set to create our first migration. In order to create a migration in alembic you have to create a revision. This is an alembic revision that keeps track of the migrations. So let’s create our revision using the following command.
poetry run alembic revision -m "initial revision"This will create a new revision in alembic/versions/XX_initial_revision.py file. You can see it created a new Python file with upgrade() and downgrade() functions in it. It is our job to define the migration logic for both upstream and downstream changes. The upgrade() function applies the migration and the downgrade() function removes/reverts the migration. That’s all. Now populate both the methods using the following in alembic/versions/XX_initial_revision.py file.
from typing import Sequence, Union
import sqlalchemy as sa
from alembic import op

def upgrade() -> None:
    op.create_table(
        "todos",
        sa.Column("id", sa.Text(), nullable=False),
        sa.Column("title", sa.String(), nullable=False),
        sa.Column("description", sa.String(), nullable=True),
        sa.Column("priority", sa.Integer(), nullable=True),
        sa.Column("is_completed", sa.Boolean(), nullable=False),
        sa.PrimaryKeyConstraint("id"),
    )
    op.create_index(op.f("ix_todo_id"), "todos", ["id"], unique=False)

def downgrade() -> None:
    op.drop_index(op.f("ix_todo_id"), table_name="todos")
    op.drop_table("todos")
Let’s go ahead and apply the migration using this command
poetry run alembic upgrade headThat’s it. We are done with our alembic setup and we have successfully applied the migrations as well. This should have created todos_app.db file in the root folder of your project which will have an empty table called todos with the above mentioned columns. Finally, after all the initial setup the folder structure should look something like this
todo_app
├── README.md
├── alembic
├── alembic.ini
├── poetry.lock
├── pyproject.toml
├── src
│   ├── adapters/
│   ├── domain/
│   └── entrypoints/
│   └── main.py
└── tests
    └── __init__.py
Note: The detailed code structure can be found in this Github Repository
Let’s look at each of the files and folder created by Poetry
todo_app/: The root folder of our Poetry project.README.md: The Readme file of our project where you can add the projects description and more.alembic/: Alembic folder containing all of our migration revision code.alembic.ini: Alembic configuration file that is used to define database url, creating a template for the revision files and so on.poetry.lock: Its a file that keeps track of all the exact versions of the dependencies used in a project, including the hashes of their source filespyproject.toml: It is a configuration file used by Poetry to define the project’s metadata and configuration. It is similar to thepackage.jsonfile used in Node.js.src/: The source folder of our project where all the logic including ports and adapters reside.adapters/: The folder where all of our adapter code is present.domain/: The folder where all the domain logic is present.entrypoints/: The folder where all FastAPI routes or endpoints reside.main.py: This file acts as our main file for the whole application.tests/: It will contain all the test cases for the application. This is out of scope for this article and we will not be writing any test cases for this application.
Now, that we have setup the project and installed the required packages, let’s build our first entrypoint. Add the following code in src/entrypoints/api/todo/router.py
from fastapi import APIRouter

router = APIRouter()

@router.get("/")
def get_all_todo():
  return {"message": "hello"}
Now, configure this particular route in src/entrypoints/api/router.py like this
from fastapi import APIRouter
from .todo import router as todo

router = APIRouter(prefix='/v1')

router.include_router(todo.router, prefix='/todo', tags=['todo'])
Here, we have configured the get_all_todo() endpoint. Let’s create a FastAPI instance and connect our application router to it in src/entrypoints/api/main.py
from fastapi import FastAPI
from .router import router

app = FastAPI()

app.include_router(router=router)
Now that we have added our entrypoint or route to the FastAPI instance, let’s start the FastAPI application in src/main.py file.
import uvicorn
from entrypoints.api.main import app

uvicorn.run("entrypoints.api.main:app", host="0.0.0.0", port=8000, reload=True)
That’s it, we are done with the FastAPI setup. We can now run the following command to run the FastAPI application on port 8000. The swaggers documentation can be accessed here http://localhost:8000/docs
poetry run python src/main.pyNow that we are done with the FastAPI setup and also configured a route, let’s start with defining our Ports. But before that, we need to define our database table. So, add the following in src/adapters/db/schema.py file.
from sqlalchemy import (
    Boolean,
    Column,
    Integer,
    String,
    Text,
)
from contextlib import contextmanager
from sqlalchemy import create_engine
from sqlalchemy.orm import (
    declarative_base,
    sessionmaker,
)

SQLALCHEMY_DATABASE_URL = "sqlite:///./todos_app.db"
Base = declarative_base()

class DBSession:
    def __init__(self) -> None:
        self.engine = create_engine(
            SQLALCHEMY_DATABASE_URL, connect_args={"check_same_thread": False}
        )
        self.Session = sessionmaker(autocommit=False, autoflush=False, bind=self.engine)

    @contextmanager
    def get_db(self):
        session = self.Session()
        try:
            yield session
        finally:
            session.close()


class TodoTable(Base):
    __tablename__ = "todos"

    id = Column(Text, primary_key=True, index=True)
    title = Column(String)
    description = Column(String)
    priority = Column(Integer)
    is_completed = Column(Boolean, default=False)
For simplicity sake, I am adding the database session class in the same file. If you want you can create a new file called session.py and add all the session related code there. Anyhow, we are done with table creation part. Let’s begin defining our Ports. So in src/domain/ports/todo.py file, add the following
# TodoPort
# path: src/domain/ports/todo.py
from typing import List, Protocol

from adapters.db.schema import TodoTable

class TodoPort(Protocol):

    def create(self, todo: TodoTable) -> None:
        """Create a new todo"""

    def get_all(self) -> List[TodoTable]:
        """Get list of all todos"""

    def get_todo_by_id(self, todo_id: str) -> TodoTable:
        """Get todo by unique todo id"""

    def update(self, todo: TodoTable) -> None:
        """Update existing todo with updated values"""

    def delete_todo_by_id(self, todo_id: str) -> None:
        """Delete a single existing todo with todo Id"""
Note: We are adding our ports under domain folder. This is a common practice since ports only define an interface and do not include implementation logic. Anything that implements ports will go under adapters folder.
From the above it should be pretty clear that we have defined our ports which means we have exposed our application to connect to adapters through these ports. Let’s implement these ports in src/adapters/todo_adapter.py file
# TodoAdapter
# path: src/adapters/todo_adapter.py
from typing import List

from adapters.db.schema import TodoTable, DBSession
from domain.ports.todo import TodoPort

class TodoAdapter(TodoPort):
    def __init__(self) -> None:
        self.db_session = DBSession()

    def create(self, todo: TodoTable) -> None:
        with self.db_session.get_db() as db:
            db.add(todo)
            db.commit()

    def get_all(self) -> List[TodoTable]:
        with self.db_session.get_db() as db:
            return db.query(TodoTable).all()

    def get_todo_by_id(self, todo_id: str) -> TodoTable:
        with self.db_session.get_db() as db:
            return db.query(TodoTable).filter(TodoTable.id == todo_id).one_or_none()

    def update(self, todo: TodoTable) -> None:
        with self.db_session.get_db() as db:
            todo_to_update = self.get_todo_by_id(todo_id=str(todo.id))
            if todo_to_update is None:
                raise ValueError("Error: Item not found")

            todo_to_update.title = todo.title
            todo_to_update.description = todo.description
            todo_to_update.priority = todo.priority
            todo_to_update.is_completed = todo.is_completed

            db.add(todo_to_update)
            db.commit()

    def delete_todo_by_id(self, todo_id: str) -> None:
        with self.db_session.get_db() as db:
            todo = self.get_todo_by_id(todo_id=todo_id)
            db.delete(todo)
            db.commit()
As you can see, we are only implementing the ports that we defined previously. This is a common database CRUD operation code where we interact with sql database through Sqlalchemy ORM.
Let’s summarise what we have done so far. We have created an API endpoint and configured our FastAPI application to it. Next, we have defined our database port that exposes certain functions to adapters. Finally, we have implemented those ports in our database adapters code.
Now, let’s go a bit further and connect our FastAPI endpoint and the database adapter so that we get a single flow of data from FastAPI to database. You can directly connect them or you could use another layer called service layer to interact with endpoints and database adapter layer. This is again a common practice to decouple our codebase. Let’s create a service called TodoService in src/domain/todo/service.py where most of our domain logic goes.
# TodoService
# path: src/domain/todo/service.py
from typing import List
from adapters.db.schema import TodoTable
from domain.ports.todo import TodoPort
from domain.todo.model import TodoModel

class TodoService:
    def __init__(self, todo_port: TodoPort) -> None:
        self.todo_adapter = todo_port

    def create(self, todo: TodoModel) -> None:
        todo = TodoTable(**todo.model_dump())
        self.todo_adapter.create(todo=todo)

    def get_all(self) -> List[TodoModel]:
        todos = self.todo_adapter.get_all()
        return TodoModel.from_db_model(todos)

    def get_todo_by_id(self, todo_id: str) -> TodoModel:
        todo_by_id = self.todo_adapter.get_todo_by_id(todo_id=todo_id)
        return TodoModel.from_db_model(todo_by_id)

    def update(self, todo: TodoModel) -> None:
        self.todo_adapter.update(todo=TodoTable(**todo.model_dump()))

    def delete_todo_by_id(self, todo_id: str) -> None:
        self.todo_adapter.delete_todo_by_id(todo_id=todo_id)
If you notice here we are importing TodoModel which we have not created yet. TodoModel is a Pydantic model that validates the data that comes from request body of endpoints. Let’s quickly look at how it is defined in src/domain/todo/model.py
# path: src/domain/todo/model.py
from typing import List
from pydantic import BaseModel, ConfigDict
from adapters.db.schema import TodoTable

class TodoModel(BaseModel):
    model_config = ConfigDict(from_attributes=True)

    id: str = ""
    title: str
    description: str = ""
    priority: int
    is_completed: bool

    @staticmethod
    def from_db_model(todo: TodoTable | List[TodoTable]):
        if isinstance(todo, TodoTable):
            return TodoModel.model_validate(todo)
        return [TodoModel.model_validate(t) for t in todo]
You can add a bunch of validations to your data, but for this example I am sticking with these. Feel free to add your own validations and customise it as you like.
Now that we have our service layer that connects the gap between our endpoints and database adapter, all we have to do now is to connect the service with our endpoints so that the data from endpoint will pass through our service layer and then interact with our database adapter and return the required data back to us. With this, our flow should be complete.
Update the following route in src/entrypoints/api/todo/router.py by adding service object and calling the adapters through our service layer.
# path: src/entrypoints/api/todo/router.py
import uuid
from fastapi import APIRouter, Depends
from adapters.todo_adapter import TodoAdapter
from domain.todo.model import TodoModel
from domain.todo.service import TodoService

router = APIRouter()

def get_todo_service() -> TodoService:
    todo_adapter = TodoAdapter()
    return TodoService(todo_port=todo_adapter)

@router.get("/")
def get_all_todo(service: TodoService = Depends(get_todo_service)):
    return service.get_all()

@router.get("/{id}")
def get_todo_by_id(id: str, service: TodoService = Depends(get_todo_service)):
    return service.get_todo_by_id(todo_id=id)

@router.post("/create")
def create_todo(todo_model: TodoCreateModel, service: TodoService = Depends(get_todo_service)):
    todo_id = str(uuid.uuid4())
    service.create(todo=TodoModel(**todo_model.model_dump(), id=todo_id))
    return {f"Todo Created with id: {todo_id}"}

@router.put("/update")
def update_todo(todo_model: TodoModel, service: TodoService = Depends(get_todo_service)):
    service.update(todo=todo_model)
    return {f"Todo Updated, id: {todo_model.id}"}

@router.delete("/delete/{id}")
def delete_todo_by_id(_id: str, service: TodoService = Depends(get_todo_service)):
    service.delete_todo_by_id(todo_id=_id)
    return {f"Todo Deleted, id: {_id}"}
Alright, now we have everything we need. We have our FastAPI routes declared, a service layer that passes data to the next layer, ports, or interfaces where we have declared specific functions through which the adapters can connect, and finally the adapters themselves, which perform the data operations. If you observe closely, our core logic in the service layer doesn’t concern itself with the next layer. It doesn’t even know it’s passing data to an adapter. Its role is simply to call functions declared in the ports. That’s the power of this pattern: the core logic remains unaware of the adapters. For example, in this case, it doesn’t matter whether you’re using a database or a REST API handler. The core logic will invoke the functions defined in the ports. However, it’s crucial that the adapters are properly configured with the ports.
Now try running this command and see the magic unfold.
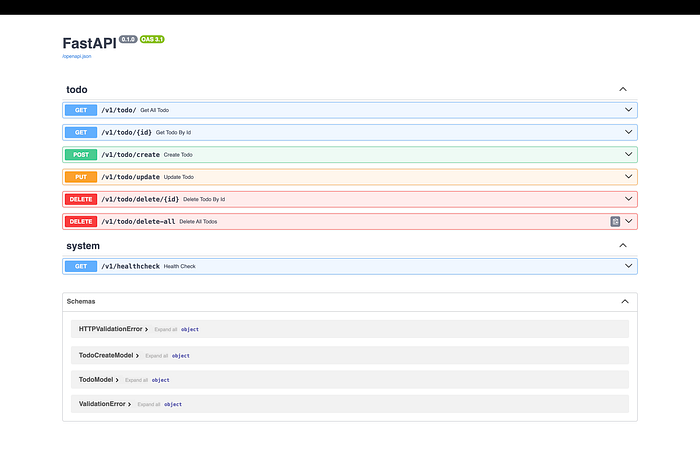
poetry run python src/main.pyThe above command should run the FastAPI application and You can find the swaggers documentation at this url http://localhost:8000/docs. Your output should look something similar to this.
Note: The output might vary because I’ve added a couple of new endpoints other than the ones discussed in this article. Please feel free to modify as you like.
Conclusion
In this article, we explored the ports and adapters pattern, discussing its advantages and potential drawbacks. We also walked through building a Todo application from scratch using FastAPI, and configured Alembic for database migrations. During this process, we created new ports, implemented their corresponding adapters, and connected them through the service layer. This pattern effectively decouples the core logic from external dependencies, allowing us to concentrate on development and scalability. I hope you found this article helpful. I will see you in my next article. Until then, as always code learn repeat ……..
References
- Github Repository
- Alembic First Migration Doc
- Pydantic Documentation
- Hexagonal Architecture in Python by Douwe van der Meij
- Hexagonal Architecture, there are always two sides to every story
Follow for more…